mercredi 28 février 2018

GreMir Models Thanks

Just wanted to give a big shout out to Michael Krol of GreMir Models.
I bought two F-82G models and I couldn't get them to print.:confused:
I contacted Michael and he stayed with me till we got the problem solved.:)

These models look like a good long-term project but doable. Thanks, Michael.


CF-100 by Oddball Productions/Murphs Models

I finished this guy in slightly scaled down version.Builds very nicely,all parts fit as they should.There are some issues with colors but they are on underside and easily fixable.

This model I printed on giant (industrial size) laser printer as a test.Test passed with flying colors as pictures show.Click on picture for much larger size.


Maintain Roundness of Cylinders

People use formers inside of aircraft fuselages to help maintain the shape. Formers can also be used to help maintain the shape of cylinders when making towers for buildings. They also help in the glueing of other parts to the towers by supporting the glue tabs. Measure the diameter of each end of the cylinder and cut formers to fit inside. Holes in the formers help positioning and securing the other former.

Pictures showing the slight tear drop shape without formers:

It does not look too bad now but continuous handling during the build of the model will distort the shape.

Formers:

They are different sizes here because the tower is part of a lighthouse and is tapered. This technique will also work on cylinders that maintain the same diameter throughout the entire length. You could leave one of them without a hole, but if you do make sure the one with the hole is the first one you insert into the cylinder. You can use the open end of the clylinder to seat that former then use the hole to position and seat the second former.

One of the formers inserted:


Other former started:

Note the position. The hole in the first former is used to seat this one.

Turn the cylinder over and use something to reach through the hole to seat the other former.


Second former in position and seated:


Tower with both formers in position:


I have found that this also works with tires on vehicles that have a disk for the outer and inner side and the tread that is a strip with the sawtooth glue tabs. I always had trouble putting the outer and inner disks on the tread until I tried a variation of the technique described in this post.


Adobe Acrobat issue?

I purchased a nice little kit of a F4F-3 Wildcat from S&P, recolored by Gerry from the ecardmodels site. While I was drooling over it. I noticed something missing. The A/C codes "F-1" were not there! I PM'd Gerry about this and he replied saying they were there on the copy he sent to ecards. I checked again and they were still not there. For some reason I opened the file with my Android Google PDF reader and they were there! I fiddled around in Adobe for a while and changed the mode to "single page" The codes appeared! For some reason they do not show in "reading mode" but work fine in all the other modes.

I have Googled for issues with Adobe and there are a lot but not apparently directly explaining this issue. Has anyone else had this or a similar problem with Adobe? In any case be aware of this if you use Acrobat on at least Android.


Vintange Village Diorama - patricia m flickr

A vintage village diorama was found while exploring a flickr page posted by patricia m.
Go here https://www.flickr.com/photos/taffet...7613325110693/ then click on Découpages Dimanche...


F-111 recommendation

Hey folks, I’m looking for a kit recommendation for an F-111. I want to build it as a gift to my Dad, who turns 80 this year. In the early 1960’s he did a 3-year stint in the US Navy, on “loan” from Western Electric (remember Western Electric?). He spent his entire service at Kirtland AFB in Albuquerque, New Mexico, assigned to the joint Air Force/Navy Nuclear Weapons Testing & Evaluation facility. He was on the team that designed the nuclear weapon arming and firing system for the F-111. He doesn’t need another sweater for his birthday, and I think he would be really geeked out by model of the ol’ Aardvark.

My general interest is tanks and trucks, so my awareness of what’s out there in aircraft is sketchy at best. I have the old Fly Model F-111 kit in my stack, but I acquired it 15 years ago and the printing is pretty bland. I could build that kit, but I’m hoping someone here can point me in the direction of a more recent and better produced kit. Any suggestions would be greatly appreciated!


As a side note: I owe my life to Kirtland AFB and the F-111! It was during this time that my dad met my mom. My mom was a high school teacher and was dating my dad’s roommate on the base. The roommate was an Air Force test pilot, and was reassigned to another location for a number of months. Before he left, he asked my dad to “look after my girl while I’m gone.” The rest, as they say, is history!


mardi 27 février 2018

JSC ships in progress

Ok ive been told i really need to finish something.All these are works in progress of jsc models rescaled by them to 1;250 scale.

Attached Images
File Type: jpg newbie 001.JPG (3.56 MB)
File Type: jpg newbie 002.JPG (3.55 MB)
File Type: jpg newbie 003.JPG (3.52 MB)
File Type: jpg newbie 004.JPG (3.52 MB)
File Type: jpg newbie 005.JPG (3.45 MB)


Hello!

I've already met a few members, not in the best conditions, so its time to say hi. Havent seen much yet but already like this community a lot! I also made a thread on the "First Cuts; A Lounge" asking some questions, i think it is a better introduction there. Anyways glad be here :D


Questions about papercraft making techniques and how to improve.

Hello! Im new to this forum. I have several questions i would like to ask, so im posting them all on the same thread to prevent spam, hope thats ok.
I was making papercrafts years ago but i didnt trust myself (i was young) and made mostly cubeecrafts. Now that i started again, i found the courage to make some models, my younger self wouldnt even consider trying. Not much but its an improvement for me :D
I still have some issues though and i would like your opinion on them.

So the the second start of my papercraft "joyrney" begun when i decided to make a gift for my friend. It was this Levi chibi model, never tried this level of difficulty before and i was impressed that i managed to do it:
https://imgur.com/v9QI6IZ

obviously it wast perfect but it was pretty good, and i was introduced to folding all the lines. With that i mean this:
https://imgur.com/a2oDtul


The models (polygon-based i think they are called?) have files with lines and line less so i assumed i have to fold ALL the lines, and i printed the line less file, folded it where i could see where it should be folded, but some straight cuts might make it difficult to show where the line should have been (dont forget its the line less model) (Here is what i mean:
https://imgur.com/K3NXshE
In the lined model you can see where to fold, in the lineless because there is no corner, you dont know exactly where)
so ive spent a lot of time trying to figure out where to fold, some wrong folds were made, some of them were fixed, the overall model looked okay.

So i thought thats the way it works with these kind of models. After that i made Bonk from Plants Vs Zombies:
https://imgur.com/2s4BcWF

This time i cut the black outlines and was a little more careful so whites didnt show and i did ok, although at some point a part wasn't long enough and that started a blank space to appear thankfully on the back which i "filled" poorly:
https://imgur.com/DILMQwl

again i folded every single line.

Now we come to my third finished model in this style (ive made some other stuff too, but not related to this question which eventually come :P )

the third model in this style is Mimikyu:
https://imgur.com/a/sVvnN
https://imgur.com/a/vPIed

So this was the hardest one in terms of being unavailable to hide the white spots, especially in its ears where the parts were small and was difficult to even glue them propertly. As you can see here too i've folded EVERY line. The good thing is ive found a way to fold the lines that i dont know where exactly they are, which is having the lined model on the pc monitor at the exact size as the a4 which i print and trace it thanks to to the light of the screen. Still i spent most of the time just folding which again seemed like the way to go. And after that i noticed something on the page from which i got the model:
https://3.bp.blogspot.com/-vlKRSOHQo...kyu%2Bsite.jpg

Not only the model lacks most of the folds, it looks soo much better! I thought i should do all the folds so it sticks up property with less whites showing possible. Clearly i was wrong. And now im asking, how can i achieve that?? Sure my model doesnt look that bad but its pretty lame compared to this one... What advice can you give me? Can i just stop folding all the lines, save A LOT of time and make my model better just like that? I mean its smoother i knew that but i thought that by not folding all the lines i would cause problems. Also im aware of edge coloring, but i dont have markers matching the color of the model, i had green for the bonk but it doest need it, few whites are showing only which isn't the case with mimikyu. Any advice on edge coloring though would be helpful too :D


So lets get to the second question: Apart from these models and some other easier ones i started two other models, like side-projects, because they will take more time and i can do the work little by little without getting bored. The first one is Glados from Portal which also needs your advice. Ive now cut all the pieces and i have to fold and glue them. The problem is most of them are pretty small. I started doing the 4 cores. On the first one i accepted my fate that ill have to reprint some stuff because i was gonna ruin them just like the first core:
https://imgur.com/XdJv1Ye
as you can see it hardly looks like a sphere and it has glue over its eye.

In this point ill have to note that i HATE the style this template was made, and by that i mean this:
https://imgur.com/Y5GMFnT
(hope its ok to upload this pic)

having "glue triangles" on both sides, alternating between them what for? Its only more difficult to glue the pieces together (here i draw what im talking about:
https://imgur.com/B9CUGAc
)
Also Do you see the tiiiny triangles which you are supposed to glue? really? how am i supposed to apply glue to 2 atoms and expect them to hold the other part of the paper. Its too small, my cutter hardly cuts it without ripping it and more hardly i fold it. So i decided to fix the second problem, by cutting them completely, i could also fix the first one in photoshop or simply by cutting glue areas where i wanted but it was too late. So with the second problem which ruined the first core i decided to give it another try, and the other 3 cores turned out almost fine!:
https://imgur.com/a/4H9Yi

So i want your opinion for those two "problems". Are they problems to you too? Is it just bad template making? Are there benefits from this? Did i do something wrong? Im also aware of strip gluing or how its called where you glue strips from the inside to replace the glue areas but i couldnt do it in such a small surface, and certainty not when im closing the sphere.

I would also like some advice on dealing with such small parts. I know i can use a toothpick, which i tired but didnt do much tbh, maybe its me, maybe its my glue:
https://imgur.com/3960cZ3

I hate that glue :) I hate it because a. Glue sticks on the edge all if the time, preventing glue from coming out and b. Almost 90% of the times i push it as gently as i can so only a little glue comes out but apparently that triggers it to wake up and start unleashing an unstopapble wave of gluermaggedon which can only be prevented by putting the cup back on, which guess what, stops it only until you take it back off. Im as gently as possible, im pretty sure it isnt me the problem but who knows. I dont know if i can find a more appropriate glue in my country (Greece) though....

Anyway any general advice before continuing my Glados model would be apreciated :D

(btw the other model im starting was a goal in life to make from the time i first saw it when i was young and i was sure no mortal could make it. Well here i am now starting it and honestly im not that worried. its Very big, with lots of parts, but none of them really are that small as i saw, nor i think there are much tricky stuff to do, maybe im wrong. the model is the 50 page Howls Moving Castle! :D i didnt even know the movie, which im gonna see soon enough, But i LOVE the design and i generaly LOVE steam-punk themed stuff and more unique models like this one. Until now i've cut 8 pages, so i have a way to go, if i need help with it, ill ask when the time comes.)

And the last question, different from the others: I know that most models are based on digital 3d models, which are converted to low resolution polugon or something like that and with peprakura are converted into 2d templates. I have no experience with 3d modeling but i was wondering, could i find 3d models do this my self? I havent done much research, i thought it would be better to ask here. i know there are sites with free 3d models, ill have to search more about the copyright stuff, but at least for me, can i just take a 3d model, import it somehow to perdurable and have it ready to be printed? Is it that simple? No modifications needed?
Also one extra question but related to "editing" models. How could i re texture a model? I can use photoshop well, the problem is not putting in on top of a template. My problem is how to wrap the texture, or drawing or whatever so it connects well. i mean there are 2 different parts that are to be glued side by side, so the texture must continue from one to another. Is there any software, or maybe perpakura itself that is capable of such stuff? i dont know, peprakura has information about which part is connected to which so maybe use that info to automatically place the remaining texture to the right part on the right side etc.

Thats all i guess. I know is a big post, i thought there had to be context so you understand what im saying. Sorry for any mistakes, its my first Thread and im really happy to be introduced to this community :D
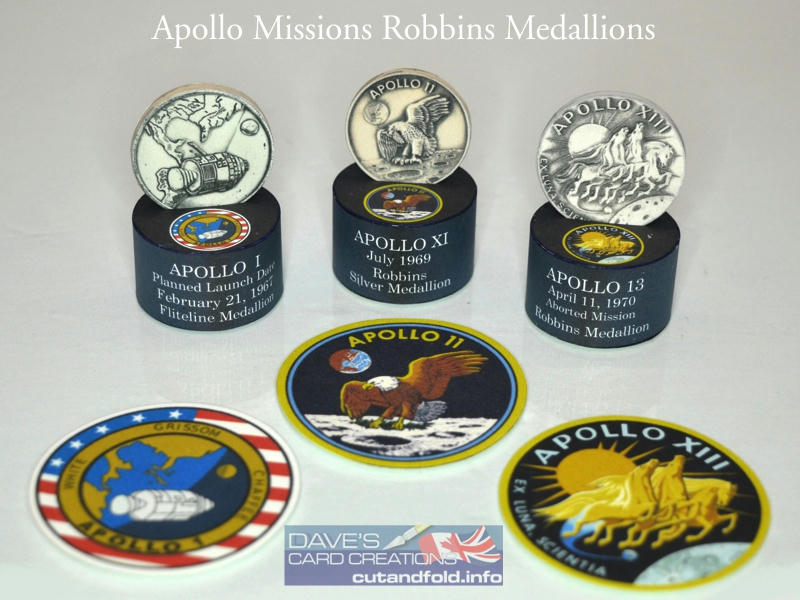
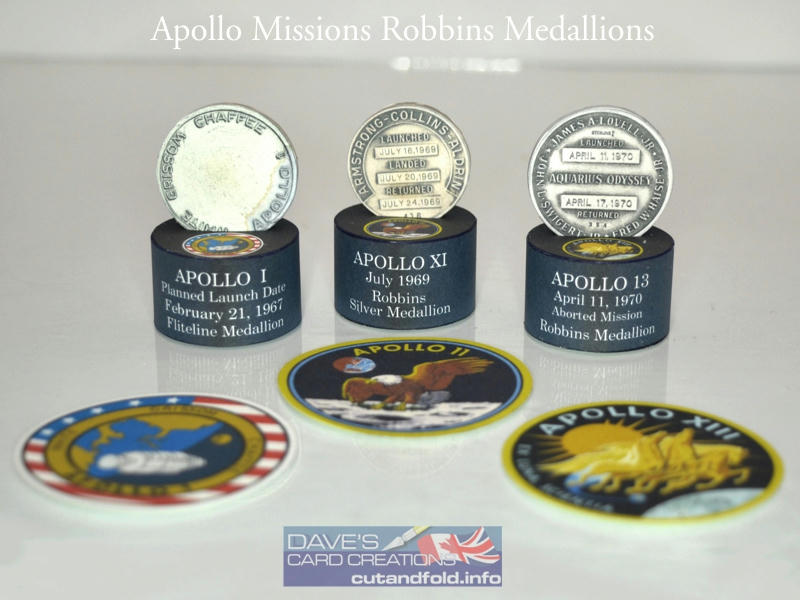
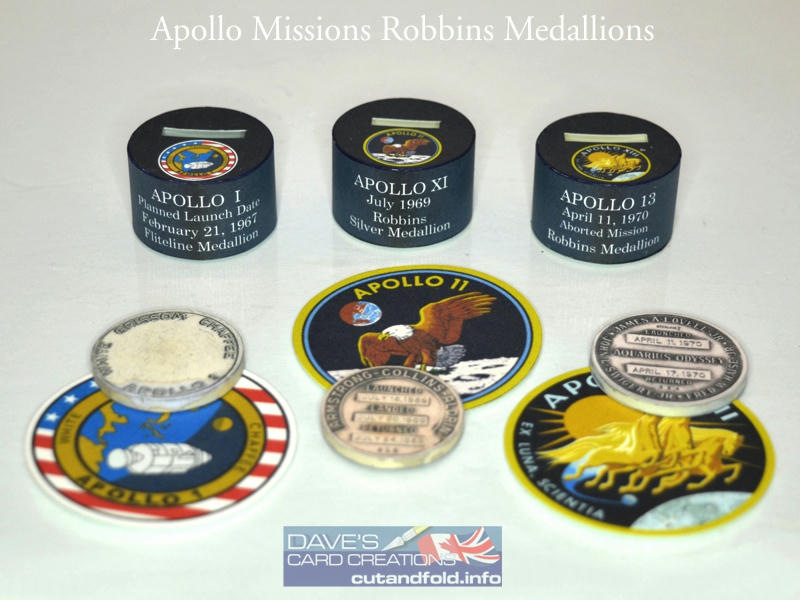
Flightline/Robbins Silver Medallions - Apollo missions

This was a suggestion by my forum Moderator Vermin King last year.
And a great suggestion it was, because as usual, when researching a model project,
I learn so much about that subject...and things that I never knew.

And, the fact that I have a personal interest in all things Space, and Rocket, and the Apollo space program
makes this a very interesting project.

I've had these models completed since last year...but I just never got around to publishing...apologies.


The Medallions were mainly designed by the crews of each Apollo mission and flown on various space flights.
The are marked with the dates and flights on the reverse.

I think they were mainly to serve as gifts and mementos to colleagues, relatives and VIPs.

I chose to focus on three important Apollo missions...
the ill fated Apollo 1 which never flew due to a fatal ground fire.
Apollo 11, which went to the Moon and back.
And the aborted Apollo 13 Moon mission that made the entire World hold its collective breath.

The paper Medallions are each exact size to the real Medallions and each come with a display stand.
Not a difficult build, but patience is required to assemble everything precisely and cleanly.
The Model sheets also feature basic information on the Robbins Flight Medallions and copies of the Mission Patches.

You can download the individual Medallions (model sheets) at the cutandfold forum:
www.papermodelforum.com

You'll find them in the Free Stuff area of the Member's Forums.
Yes, you have to register on the Forum to access that area.
But theres lot of free stuff in there.
(Its also where you can download the Assembly sheets for Koolwheelz models)


JSC tug Virtus (scale 1:100) and historic Gdansk buildings (scale 1:200)

There are two new models available at store.jsc.pl. One of them is “Virtus” - tractor tug JSC 109 (scale 1:100). This is modern tug which is often seen in Port Gdansk.
In our webstore store.jsc.pl you can see photos of ALL kit’s pages (excluding written instruction) - to give you some idea what inside the kit. Also many photos of built model.
There are also 4 historic Gdansk - Oliva buildings (all in one kit) available at JSC webstore - JSC 212 (scale 1:200): St.Jacob’s church, Larder, Gate House and Abbot’s stable.

regards,
Kasia Czolczynska

Attached Images
File Type: jpg Virtus 01.jpg (401.5 KB)
File Type: jpg Virtus 05.jpg (499.2 KB)
File Type: jpg 109 Virtus 01.jpg (215.6 KB)
File Type: jpg 109 Virtus 03.jpg (276.8 KB)
File Type: jpg 109 Virtus 06.jpg (183.1 KB)
File Type: jpg 109 Virtus 09.jpg (298.5 KB)
File Type: jpg 109 Virtus 11.jpg (258.2 KB)
File Type: jpg 109 Virtus 12.jpg (217.4 KB)
File Type: jpg 109 Virtus 16.jpg (291.2 KB)
File Type: jpg 212 Jakub 01.jpg (318.7 KB)
File Type: jpg 212 Jakub 04.jpg (173.9 KB)
File Type: jpg 212 Jakub 08.jpg (251.0 KB)
File Type: jpg 212 Jakub 11.jpg (247.9 KB)
File Type: jpg 212 Jakub 13.jpg (314.9 KB)


lundi 26 février 2018

GPM Platforma Ursus + TK3

As I mentioned in my introduction to the forum message a few weeks ago, I'm getting back into the card modeling hobby after a 15 year or so hiatus. In addition to starting a new project or two (such as Patton's M1A1), I've been assessing a bunch of models in various states of completion that I had boxed up, in order to determine what is salvageable.

Back in 2002 (I think), when I started and then abandoned this kit, I really liked the idea of a tank that comes with it's own truck (or maybe a truck that comes with it's own tank?). I still think it's a pretty neat kit, and I'm pretty sure I have all the parts.

The picture shows the state of the kit as I unboxed it. It is in good shape, although I used black for edging. I'll do a better job of color matching moving forward, and hopefully the prior black edging will become less prominent.

The kit also includes a page with 2 figures and a bicycle to build. I had forgotten about this page until I started flipping through the model kit; I ignored the paper people in a couple of GPM models built years ago. I thought I would ignore these as well, until I found the 3rd picture I attached to this post.

I was looking for reference pictures on the interwebs, and found this picture of the TK3 on the back of a platform truck, with a bicycle thrown onto the back! There are a couple of dudes milling about that look suspiciously like the paper people. It makes me wonder if this photo was used for reference by the designer (although the truck is not the same, I think the truck in the picture is maybe a Fiat?). So I feel certain I will build the bicycle to throw on to the back of the truck, and perhaps the paper people as well.

More to come...

Attached Images
File Type: jpg IMG_9149.JPG (2.01 MB)
File Type: jpg IMG_8652.JPG (1.76 MB)
File Type: jpg TK3 with bicycle.JPG (1.49 MB)


Cardboard Box Clock

https://newgottland.com/category/cereal-box-clock/

Make a clock with working escapement with an empty cereal box.
A more durable model could be made using thin foam core rather than cardboard.


Douglas SBD Dauntless

I haven't displayed anything in gallery for a while, so here's another one from my collection.
Mały Modelarz, scale 1/33


Improved tank tracks

I've built quite a few 1/50 scale tank models, and have always thought that the tracks on 1/50 and smaller tanks are a weak point. There are two main problems: 1. stiffness. 2. No track guides.

I've successfully addressed problem #1, and have a plan to resolve problem #2 with my next tank build.

On most parts pages of this scale, the upper and lower track strips are a unified piece which is simply scored down the middle, and folded over to form a long track of double thickness paper. Some modelers (including me) score and bend each link to add a bit more realism. Others just wrap the strip around the suspension parts and glue in place. Either way, the effect is just not convincing.

This time, I glued the unified upper/lower track strip to a scrap piece of card stock, and then cut the strip in half at the usual score line. I colored the long edges of the strips, and then cut the strips into individual links, and colored the exposed edges. I separated the links into two piles (uppers/lowers, inners/outers, bottoms/tops), whatever you want to call them.

Then I made a simple jig from a piece of clear pine, and glued a wooden paint stirring stick along one side as a guide. The second guide is a piece of mat board push pinned into place with a gap the width of the track. I carefully laid down the bottom links one by one, and then overlaid 2 taut lines of black thread, held tight with push pins at either end. Then, one by one, I glued the top links in place, trapping the thread in between, creating a long track of 4 paper thicknesses.

I freed the track, and "cracked" each link to break up any that might have been tacked together slightly during the gluing process. The resulting track was wonderfully flexible and snaky. Simply from it's own weight, it created realistic sags between the upper rollers. I couldn't be happier. It was well worth the extra time and effort. The jig is easily adjustable to accommodate any width track.

Attached Images
File Type: jpg 0219181502.jpg (1.68 MB)
File Type: jpg 0225181247.jpg (1.52 MB)
File Type: jpg 0226181513.jpg (1.56 MB)


BPM A7v 1/87

This morning's build. Wotan from the defunct BestPaperModels. A nice, easy build, good fit and nice graphics.